Pixar his released its Academy Award-winning RenderMan software to use for free for noncommercial use. The program can be used for research, education, evaluation, plug-in development and any personal projects that do not generate commercial profits. Download here.
the website rabbit is amazing for watching netlfix, youtube, hulu and more with your friend/datemate/queerplatonic babe. seriously, you can chat, watch movies and tv together, and see their face and hear their voice. signing up is completely free and up to 10 people can be in the same chat. please please give this website a try, you won’t regret it.
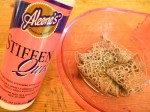
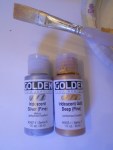
Step 1: Place lace in a small bowl and cover with fabric stiffener. Soak for 15 minutes.
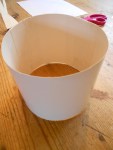
Step 2: While lace is soaking, prepare a crown form by cutting a 20” x 4” strip of posterboard. If using a smaller piece, cut two 10.5” x 4” pieces. Overlap by a 1/2” and tape together on the front and back.
Step 3: Roll the posterboard in to a tube, 17.5” in circumference, and secure with packing tape.
Step 4: Remove lace from bowl, allowing excess to gently drip back in to the bowl. Return excess stiffener to the original bottle. Wrap the wet lace around the base of the posterboard form. I used a spot of tacky glue to hold the overlapping ends of the lace together.
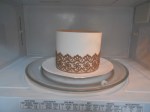
Step 5: Put crown and form on a paper plate or piece of parchment. Microwave on high power for 30 seconds. There may be some crackling sounds in this initial phase. Continue to microwave in 30 second increments (depending on the power of your microwave, you might be able to go up to a max of 1 minute increments), until the lace is dry to the touch.
Step 6: Remove plate from microwave and completely spray the crown (while still on the form) with stiffener. Return to microwave and microwave in short increments till it is dry to the touch.
Step 7: Repeat the process of spraying and drying until you’ve achieved the desired level of stiffness. For me, I found that 7 spray/dry cycles was sufficient.
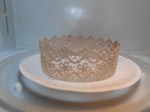
Step 8: Remove crown from the form. You may need to slide a butterknife or offset spatula underneath to help loosen it. If some of the stiffener has closed up some of the holes in the lace, you can easily clean it out with the end of a pin.
Step 9: Return the crown to the plate and microwave for an additional 30 seconds to a minute. When removed from microwave, crown should be completely dry and stiff. Set the crown aside while you set up your paint
Step 10: Wearing rubber gloves to keep your hands clean, paint the crown, inside and out. Do not be surprised when the crown goes soft with the application of the wet paint. It will stiffen, harder than ever, when it dries.
Step 11: Gently slide the wet crown back on to the posterboard form. Set aside to dry. You can use a hairdryer to help speed up the process, but DO NOT return the crown to the microwave.
Step 12: When crown is dry, attach bits of glitz and finery with a hot glue gun or jewelry glue. I used bits of broken vintage jewelry that I dismantled with the help of tin snips.
Just in case anyone was ever wondering, you can make Kronk’s Spinach Puffs at home, and they taste awesome.
Kronk’s Spinach Puffs
2 cans (8 oz each) Pillsbury refrigerated garlic butter crescent dinner rolls, or reg crescent rolls.
1 package (8 oz) cream cheese, softened.
3 eggs
1 small onion, chopped (¼ cup)
1 box (9ox) frozen chopped spinach-thawed, squeezed to drain, or chop fresh spinach
¼ tsp salt
1/8 tsp pepper
1 cup shredded mozzarella cheese
Heat oven to 350*. Spray 16 muffin cups with non-stick cooking spray.
Separate each can of crescent dough into 8 triangles. Press 1 triangle on bottom & up the side of each muffin cup.
In large bowl, beat cream cheese with electric mixer on medium speed til smooth. Add eggs, beating well after adding each. Stir in onion, spinach, salt & pepper until well mixed. Fold in cheese. Fill each cup to the top with the egg mixture. Don’t overfill!
Bake 15-20 minutes or until knife inserted comes out clean and edges of rolls are golden brown. Serve Warm.
Hello there, fellow gigantic nerd! Do you have the need to make game-accurate Sera pants? Maybe a cute dress from Dales Loden Wool? WELL BOY HOWDY, YOU’RE IN LUCK.
Inspired by way too many hours of crafting in Dragon Age Inquisition, I figured we could all stand to do a little real-life crafting. Great for cosplay, also awesome for more day-to-day projects, Spoonflower provides a ton of different fabric types you can get these prints on.
I’ve done my best to get the sizes and colors as game-accurate as possible, and have provided a few screenshots to job your memory. (Some have wonky lighting – forgive, me, as DAI doesn’t want to zoom) HOWEVER, if your project calls for something a little different, don’t hesitate to contact me! I’m happy to tweak patterns, and I love love love seeing photos of your awesome work!
Even if you’ve ordered from Spoonflower before, I HIGHLY ENCOURAGE you to order a sample swatch of you desired pattern/fabric combo first. Colors vary across fabric types and I can’t test every single combination, so get a test swatch. GET A TEST SWATCH. If it comes out weird, let me know, and we’ll get it right!
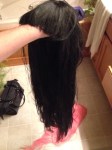
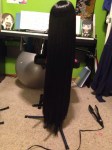
oh my god I can’t believe it!!!!!!! I actually got my wig basically back into the condition that it was in when it was brand new!!!!!! DAMN I did NOT expect a result like that holy shit I’m so happily surprised since it was SO tangled and greasy like omg so I’m gonna explain what I did so hopefully other people can fix their own wigs in the future!!!!!
first, I washed the wig. I put the wig on a wig head on top of a guitar stand so that it was elevated and none of the hair was touching the ground. I got a spray bottle, filled it with 3 squirts of regular shampoo, 4 squirts of regular conditioner, 2 squirts of dish soap, and the rest with water and shook it up so it was combined. then I sprayed the wig all over until it was coated, rubbed the solution into the wig hair, and then brought the wig into the shower running cold water and rubbed the solution into the hair more before washing it all out.
secondly, I filled the sink with a solution of diluted fabric softener. i put one capful of fabric softener in the sink and filled the rest with water. i put my wig in the solution and let it sit overnight.
in the morning, i took the wig out of the solution and rinsed off any fabric softener in the shower again with cold water. i squeezed the water out of the wig and then took a towel and squeezed any other water out of the wig.
now this is the part that took forever lmao. while the wig was still wet, I carefully brushed all of the tangles in the entire wig with both a wig brush and a plastic comb. the fabric softener solution helped to loosen up all of the tangles. working in small sections, and from working from the bottom to the top from each section, i was finally able to brush out all of the tangles. after each section, again i would combine the completed sections and brush them as a whole. this took well over an hour haha
then, i let the wig sit for 5 or so hours and air dry.
and finally, i straightened the entire wig. again, working in small sections, i had my straightener on a fairly high setting and straightened each section, with emphasis on the bottom, because that’s where the wig was super frizzy and gross. after each section, again i would combine the completed sections and straighten them as a whole. this also took over an hour lmao orz
and there you have it!!!! my wig is good as new!!!! i was so surprised because it is such a long and thick wig i didn’t think i would be able to make it look as good as it does!!! i hope this can help other people who have horribly tangled/frizzy wigs to recover as well!!